
 Eyelash Extensions
All
8 DIY Eyelash Techniques For Length And Volume
One writer seeks to revive her ‘lackluster lashes’ with an array of at-home lengthening and volumizing options. From mascara to falsies, here’s her honest take.

Some people have taken advantage of their 2020 downtime by reading the classics on their Kindle. Others have mastered scratch-made lobster stuffed ravioli. Me? I’ve been hard at work leveling up my lashes — swiping serum, smearing liner, swabbing glue-induced tears while trying not to drop the finest falsies down the drain — all in the name of discerning the best new DIY lash treatments.
Let’s get this out of the way upfront: I’m lash challenged. They’re short, they’re straight, and, while I suppose they’re blonde, I derisively refer to them as ‘skin color.’ In other words, they are legit invisible. It should come as no surprise then that I am in search of longer, thicker, lusher lashes without mascara or other eye makeup.
What’s the best way to achieve them? I tried several (eight, to be exact) different trending products and techniques to (a) encourage actual, measurable results or (b) fake it with photo-worthy falsies, so I could report back to you on what works, what doesn’t, and what I learned along the way. From mascara to falsies, here’s my honest take on how to revive lackluster lashes.
METHOD 1: Lash Growth Serum
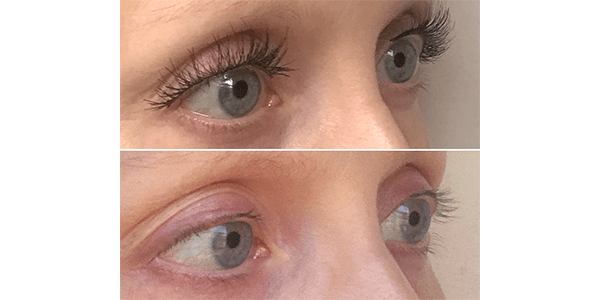
True confession: I’ve been down the lash growth serum road a few times since 2008, when the United States Food and Drug Administration (FDA) first approved Latisse® for cosmetic use and a host of copycat products came onto the market. I’ve tried several brands (Latisse®, RapidLash®, and Rodan + Fields Lash Boost) over the years with varying degrees of success, and I opted for GrandeLASH-MD this time around on the recommendation of an up-and-coming actress who gushed about its benefits and price point. At $65 for two milliliters, it’s about half the price of prescription Latisse® ($120 for three milliliters) for a three-month supply.
I got off to a rocky start with the serum, though it’s entirely my fault. I found it so difficult to remember to add this extra step to my nightly routine. With lash serums, consistency is key — most take at least four weeks of daily use to produce results. With only a few nights forgotten, the lash serum did produce noticeable results (definitely thicker and slightly longer lashes) in about a month. At six weeks, I’m still seeing further improvement. Now I pretty much look like the average person’s ‘before’ photo, and I’m calling it a win.
- PRODUCT: GrandeLASH-MD
- COST: $65
- PREP TIME: 5 seconds (just a quick read of the package directions!)
- TREATMENT TIME: 12 seconds
- RESULT: Noticeably longer, thicker, and slightly darker lashes
- DISCOMFORT: Very mild irritation for the first couple of days
- DIFFICULTY: 1 out of 5
- MAINTENANCE: Nightly usage for best results
- MAKEUP REQUIRED: No
- BEST FOR: Long-term natural lash improvement
Pro Tip: After lining each lash line, swipe the brush on brows to promote growth.
METHOD 2: Tubing Mascara
 I’ve had my eye on the Thrive Causemetics Liquid Lash Extensions Mascara for a while because it claims to check all my boxes. It’s relatively clean; it promises clump-free lash length; and it comes off without a mess. Because my natural lashes are so fair, I tried Crystal, the brown/black shade.
I learned quickly that the key to this tubing mascara is to precisely follow the directions. Multiple coats are a must, but any drying in between leads to disastrous (think: clump city) results. There is definitely a learning curve with this product, as you need to make sure you’ve got the formula down to the roots (but not too much) and build it up on the ends (without overdoing it).
Sadly, my ‘after’ photos (above) didn’t rival those eyelash extension looks plastered all over social media ads, but I did like the look this mascara produced. I had darker, longer lashes that didn’t flake or clump together; it didn’t irritate my sensitive eyes; and removal truly was a snap — just some warm water and a washcloth.
- PRODUCT: Thrive Causemetics Liquid Lash Extensions Mascara
- COST: $24
- PREP TIME: 12 seconds (read the package directions!)
- TREATMENT TIME: 2 minutes
- RESULT: Darker and slightly longer, thicker lashes
- DISCOMFORT: None
- DIFFICULTY: 1 out of 5
- MAINTENANCE: Daily use
- MAKEUP REQUIRED: Yes (it is makeup, duh)
- BEST FOR: A temporary, clump-free finish that is easy to remove
Pro Tip: Apply multiple coats while the formula is still wet, focusing on the ends to increase length.
METHOD 3: At-Home Lash Tinting
I came up with the idea to try this at home (I apologize to lash pros everywhere) while researching our story on the safety of lash tinting. After ordering vegetable-based Refecto-Cil eyelash tint online and watching their YouTube video, I tried it out for myself (one eye at a time). Mixing up the dye and developer wasn't complicated — but just about everything after that was.
To protect the area under my eyes and create a surface to “paint” the dye onto my lashes while my lids were closed, I cut cotton rounds in half. Because I was standing in front of a mirror, they were too heavy to stick to my face (at the salon, you’re reclining, so it’s not an issue). So, I ended up “gluing” paper towels to my face with Aquaphor. I also applied the ointment to my upper eyelid with a cotton swab to prevent dye from soaking into my skin.
I dipped the applicator into the blue-black mixture and carefully raised it to my lashes. I quickly realized how disconcerting it feels to get a glob of goo so close to your eyeball. Trying to keep one lid shut while dabbing on dye isn’t exactly easy. I had a feeling I wasn’t putting enough dye on, but I was too nervous to add more. I set an alarm for 10 minutes and scrolled through my Instagram feed (feeling like Long John Silver) until it was time to wipe the eye clean with a damp cotton round. I must’ve opened my eye a little on the second side because I experienced some minor stinging and watering.
While the results were not as impressive as the Beverly Hills salon treatment I used to get before it was outlawed in California, my lashes are no longer “invisible.” I love looking in the mirror and seeing actual eyelashes without feeling like I need a microscope.
- PRODUCT: RefectoCil Blue/Black Creme Hair Dye Kit
- COST: About $25
- PREP TIME: 10 minutes (read package directions, watch YouTube video)
- TREATMENT TIME: 25 minutes (10 minutes per eye, 5 minutes of setup/cleanup)
- RESULT: Black lashes that appear longer but not thicker
- DISCOMFORT: Some mild stinging and watering
- DIFFICULTY: 5 out of 5
- MAINTENANCE: Lasts for about a month depending on lifestyle
- MAKEUP REQUIRED: No
- BEST FOR: A low maintenance, semi-permanent pop for lighter lashes
Pro Tip: Leave this one to the professionals for best results.
METHOD 4: Traditional Strip Lashes
 I have a love/hate relationship with strip lashes. One one hand, they’re affordable, versatile, and fairly simple to apply once you get the hang of it. On the other hand, they’re messy and tend to trigger paranoia (Is my lash loose?) when I’m supposed to be out enjoying myself. I can’t leave home without a tube of adhesive, as they’re always popping up on the edges — usually right when we’re taking that group selfie.
I try to stick to non-toxic makeup and skincare, but lash glue (at least the brand recommended by most makeup pros) is a major offender. So, I was excited to try out a cleaner version from Tarte, Tarteist Pro Lash Adhesive in Clear, to use with my go-to assortment of Bella Hair lashes.
It had been awhile since I applied false eyelashes (hello, quarantine), so I was rusty and had to rip them off (gently) and start again. My goal was to get them as close to my lash line as possible to see if I could get away with not having to wear eyeliner. Even though I chose the most conservative lashes from the set, you could see the tiny black knots along the clear band up close, so I dabbed Tarte Tarteist Double Take Eyeliner into the lash line and just above to blend.
I wore these pretty comfortably (result above) for about six hours - including a sweaty walk in the mountains - with no re-gluing necessary. That night, after holding a makeup remover soaked cotton ball on each lid for about 20 seconds, I was able to take off the lashes and liner. I did lose quite a few lashes on one side, however, pulling off stubborn bits of glue that had somehow seeped onto my actual lashes during the application process.
- PRODUCT: Bella Hair Strip Lashes & Tarteist Pro Lash Adhesive in Clear
- COST: $16 for 60 pairs of lashes + $9 for 3.5 mL tube of glue
- PREP TIME: 2 minutes (watch a YouTube video)
- TREATMENT TIME: 8 minutes (or quicker with practice)
- RESULT: Thicker, longer lashes
- DISCOMFORT: Leftover glue clinging to natural lashes was painful to remove
- DIFFICULTY: 3 out of 5
- MAINTENANCE: Daily use only (repeat wears may be possible with careful cleansing)
- MAKEUP REQUIRED: Maybe (eyeliner can help conceal the strip lash)
- BEST FOR: A temporary, variable lash look
Pro Tip: The key to proper strip lash application is the glue. Apply sparingly (with a little extra on the ends) and wait until it’s tacky before applying.
METHOD 5: Sandwich-Style Magnetic Lashes
Magnetic lashes are having a moment. For several years, I’ve been a fan of One Two Lash, which now come in both half and full sets. These lashes feature tiny magnets along a longer lash strip and a couple of smaller magnetic lash segments that you sandwich around your own lashes. They also come with a curved magnetic tweezer-like tool to help you manage the job.
I tried both the half and full sets, but, since I haven’t used them in awhile, I got super frustrated and almost gave up after dropping the same lash segment three times into the dusty crevice of my metal-framed (read: magnetic) sliding closet door. Including search and rescue time, it took me a whopping 15 minutes to get the full strips on correctly. The applicator tool doesn’t work well with my natural eye shape, so I had to apply them manually. After adjusting the smaller, bottom lash segments approximately 87 times, I got the magnets close to my lash base. Even though I placed them perfectly, there’s no way I could avoid having to wear eyeliner to camouflage the black magnetic rectangles.
These felt fairly comfortable for about 10 hours and were very easy to take off — just pinch at the magnet and slide your fingers slightly to release. I really wanted to love these lashes, but, like Goldilocks, I couldn’t find a solution that was just right. The half set isn’t curved, so it doesn’t blend well, and the full set is too long for my eyes (you can’t trim them because you’ll cut off the magnets). I’m hoping for an improved version someday soon!
- PRODUCT: One Two Cosmetics Natural Full Lash
- COST: $69
- PREP TIME: 2 minutes (watch the how-to video on OneTwoCosmetics.com)
- TREATMENT TIME: 15 minutes
- RESULT: Thicker, longer lashes
- DISCOMFORT: Some mild stinging if magnets pinch the water line
- DIFFICULTY: 4 out of 5
- MAINTENANCE: Daily use only (avoid bathing and swimming for repeat wears)
- MAKEUP REQUIRED: Probably (depends on how dark your natural lash line is)
- BEST FOR: A temporary, variable lash look without glue or adhesive
Pro Tip: Practice, practice, practice. The learning curve on these can be steep (it takes a very steady hand!), but the payoff is worth it.
METHOD 6: Eyeliner-Style Magnetic Lashes
 Eyeliner-style magnetic lashes have been all over social media, so I was eager to check them out. My MoxieLash Natural Kit arrived with three sets of lashes, a tweezer-like applicator tool, and a tube of black magnetic eyeliner. The company’s how-to video seemed simple enough: Paint on the liner, let dry completely, curl your natural lashes and gently press on the false lashes. I deviated from the directions a bit and curled first because I knew from experience that if I applied the liner beforehand, my curler might take off much of the magnetic makeup and I'd have to re-paint.
Whoops.
Suddenly, there was magnetic eyeliner everywhere. It coated my lashes quickly and, even upon rinsing, was not budging. Don’t curl your lashes first, friends. Follow the instructions, since there’s simply no way to avoid slathering the liner onto your curled hairs because they’re curving so close to your eyelid.
After a long session with Moxie’s hyaluronic acid- and castor oil-infused makeup remover (this magnetic liner really stays put), I started from scratch. Though the brush liner was a bit trickier to apply than a pen-style product, the lashes were extremely easy to place and look quite natural with no telltale glue globs or boxy magnets to contend with.
I happily wore these all day without discomfort (result above) but removing the liner is pretty arduous. I soaked a cotton ball and let it sit on my lash line, repeating the process several times, and, eventually, scrubbing a little more than I’d like to.
- PRODUCT: MoxieLash Natural Lash Kit & All-in-1 Makeup Remover
- COST: $94 for 3 sets of lashes + $30 for 100mL remover
- PREP TIME: 2 minutes (watch how-to video on MoxieLash.com)
- TREATMENT TIME: 10 minutes (improves with practice)
- RESULT: Thicker, longer lashes
- DISCOMFORT: Mild irritation from the liner removal process
- DIFFICULTY: 2 out of 5
- MAINTENANCE: Daily use only (avoid bathing and swimming for repeat wears)
- MAKEUP REQUIRED: Yes — the lashes only stick to the magnetic eyeliner
- BEST FOR: A temporary, variable lash look without glue or adhesive
Pro Tip: Follow the instructions carefully. Use an oil-based remover to take off the liner, but an oil-free remover to clean the magnetic lashes. Watch the brand’s how-to video before trimming for a custom fit.
METHOD 7: Magic Lashes
 No glue? No magnets? No way. How do these things stick? When I heard about new strip lashes invented by industry veteran Jill Heijligers-Peloquin that attach to a “magic” eyeliner, I was intrigued. Lash Attraction works in the same way that window decals sticks to glass, so there’s no need for adhesives or magnets.
Lash Attraction allows you to choose from a variety of lash looks — including brown/black — which appeals to my fair-haired sensibilities. You get to choose your eyeliner color, too (it comes in black, brown, and clear), and the kit also includes an applicator tool and remover.
I tried the clear liner first, gave it a few seconds to dry, and gently lifted a lash strip from its case. It was extremely easy to place with just my fingertips, but, because the lash band is black, it looked like there was a gap between my natural lashes and the lash strip. If I had darker, thicker lashes, I doubt this would be an issue. I decided to try it again with the brown liner, which is remarkably similar to a regular pen eyeliner. The result (above) was much better, but not the ‘no makeup’ look that I had hoped for.
These lashes were extremely comfortable to wear throughout the day, and I loved the idea of not using adhesives or magnets, which both tend to irritate my eyes over time. Being able to trim them to any size is a big plus as well. They’re also humidity/workout safe (you just can’t swim or wash your face while wearing). I’ll definitely reach for them first when prepping for nights out. And, if I had naturally dark lashes and could wear these with only the clear liner for a makeup-free look, I’d be sporting them on the daily.
Lash Attraction comes with a “broolie” brush that you use to blend the strip into your natural lashes (the spoolie side) and to dab on their remover (the brush side). The lashes came off easily, and I cleaned them with the brand’s foaming cleanser. I did find the liner a bit stubborn to take off, but I may have been impatient and didn’t let the remover sit long enough.
- PRODUCT: Lash Attraction Kit #18 Not So Platonic
- COST: $59 for kit (one pair of lashes, liner, applicator tool, broolie brush, and remover)
- INSTRUCTION TIME: 5 minutes (watch how-to video on Lash-Attraction.com)
- PREP TIME: 8 minutes
- RESULT: Thicker, longer lashes
- DISCOMFORT: Mild irritation during the liner removal process
- DIFFICULTY: 2 out of 5
- MAINTENANCE: Daily use only for up to 30 wears
- MAKEUP REQUIRED: Yes — lashes need the eyeliner to stick
- BEST FOR: A temporary, variable lash look without glue or adhesive
Pro Tip: When using the clear liner, apply your favorite eye pencil in between lashes to fill in before placing the Lash Attraction liner and lashes as close to the lash line as possible. Watch their video on how to trim the lashes first for a custom fit.
METHOD 8: Individual Lashes
 I’ve always been reluctant to try individual knotted lashes. They seem hard to handle, tricky to place, and not very cost effective — unless you want to come home from the club and clean a couple dozen little lash pieces. But when I watched several beauty bloggers talking about using Ardell Lashtite Adhesive (on natural lashes, not skin, only!) with individual lash clusters to create a DIY lash extensions look that lasts up to two weeks, I was curious.
Enter Mari Shten, a makeup maven and luxury lash creator, who’s making silk lash clusters that are flat (rather than knotted) at the ends, so they blend better. The how-to video on her website is life changing. The faux lashes are applied to the underside of natural lashes for a much more natural look. The company’s pointed and curved tweezer tool, meanwhile, is indispensable for placing the lashes, which come in different lengths for a complete customization.
I’d love to tell you that I mastered these beauties the first time around, but it took a ridiculously long time and I didn’t get them nearly close enough to my lash line. So, I soaked them with makeup remover and picked them off with my fingernail, losing only about six natural lashes in the process. The second time around, I thoroughly cleansed my lashes, let them dry, then curled to get better lash line access. I started and ended with the shortest (six millimeter) and worked up gradually to 12 millimeter near the center, documenting the lengths as I went along for future reference. I did both eyes at the same time, starting from the outer corners and placing the extensions as close together as possible. Halfway through, I could tell that one eye had more coverage, so I added an extra 10 millimeter segment to my right eye. If I’d completed one eye before the other, I probably wouldn’t have recognized this asymmetry until it was too late.
The result (above)? The natural looking, no-makeup look I’d been seeking all along. While definitely not as seamless as professional lash extensions, I could absolutely get away with not wearing any eyeliner with these. I was thrilled at the possibility of low-cost, low-maintenance, semi-permanent lashes, until I awoke the next morning with entire segments missing. I filled in the holes, hoping it was just a fluke, but, later on that day (and the next), more pieces came loose, fluttering on the end of my natural lashes as I blinked.
This lash glue is supposed to last two weeks, and I couldn’t even get two days out of it? A quick online search revealed I’m not alone — though some people have the opposite problem, they can’t get their lashes off. Despite my disappointment, I can see myself using this technique on special occasions, since it’s time consuming but ultimately my favorite out of all the looks.
- PRODUCT: Mari Shten She’s Extra Individual Lashes & Ardell Lashtite Adhesive in Clear
- COST: $20 for 100 lashes + $5 for adhesive
- PREP TIME: 2 minutes (watch how-to video on MariShtenBeauty.com)
- TREATMENT TIME: 30 minutes (the second time around)
- RESULT: Thicker, longer lashes
- DISCOMFORT: Very mild, temporary stinging if glue gets on the water line
- DIFFICULTY: 5 out of 5
- MAINTENANCE: Lasts for up to two weeks depending on lifestyle (makeup, swimming, sweating all affect glue bond)
- MAKEUP REQUIRED: No
- BEST FOR: A longer lasting, no-makeup-required look for those with a steady hand
Pro Tip: Do a patch test with the adhesive first. Don’t get glue on your waterline! Start at the outer corners using gradual length changes, paying attention to the shape differences between the left and right eyes.
The Takeaway
My advice to you? Have fun experimenting with these lash products — they’re all worth a try. Depending on the look you’re after and your level of patience, you can achieve everything from a temporary pop to a semi-permanent boost without a trip to the salon. As for my sad little lashes, I’ve learned that, so far, there is no perfect (i.e. naturally lush looking, cheap, easy, no maintenance) eyelash product. Instead, I’m striving to embrace a new technique: Radical lash acceptance.
All products featured are independently selected by our editors, however, AEDIT may receive a commission on items purchased through our links.
KRISTA SMITHis a contributing writer for AEDIT.
More Related Articles
Related Procedures
Eyelash ExtensionsLatisse®Eyelash Implants
